Building Your Dream Cozy Nursery: A DIY Guide with Furniture Plans
So, you're expecting! Congratulations! One of the most exciting (and maybe slightly overwhelming) parts of preparing for your little one's arrival is designing their nursery. Forget the stuffy, generic nurseries of old – let's build a cozy, personalized space that's both beautiful and functional. And the best part? We're going to do it ourselves, saving a bundle and adding a whole lot of love in the process! This guide will walk you through creating a cozy nursery, complete with DIY furniture plans. Get ready to roll up your sleeves and get crafting!
Choosing Your Nursery's Style and Theme
Before we even think about sawing wood, let's brainstorm the overall vibe. What kind of feeling do you want to create for your baby's room? Think about colors, textures, and overall style. Do you envision a rustic farmhouse nursery, a modern minimalist space, a whimsical woodland retreat, or something completely unique?
Brainstorming Your Nursery's Personality:
This is where you get to unleash your creativity! Grab a notebook, Pinterest, or even just a good old-fashioned brain dump. Consider:
- Color Palette: Think calming neutrals like creams, grays, and soft blues, or opt for bolder pops of color that reflect your personality. Remember, you'll be spending a lot of time in this room!
- Theme: Animals, stars, rainbows, books – the possibilities are endless! A theme can help guide your furniture choices and décor.
- Texture: Mix and match textures for visual interest and coziness. Think soft blankets, woven baskets, natural wood, and plush rugs.
- Overall Feeling: Do you want a serene and calming space, or something more playful and energetic?
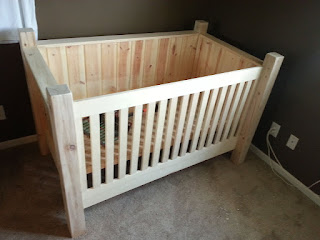
DIY Baby Furniture Plans: The Crib
The crib is the centerpiece of any nursery, and building your own is a rewarding experience. This plan focuses on a simple, safe, and stylish crib design. Remember, safety is paramount when building a crib, so always adhere to strict safety standards and regulations. You may want to research your local regulations and ensure compliance.
Crib Materials:
- Wood: Pine is a popular and affordable choice. Make sure it's properly dried and free of knots.
- Screws: Use high-quality wood screws designed for furniture construction.
- Wood Glue: A strong wood glue will provide extra stability.
- Sandpaper: Various grits for smoothing the wood.
- Paint or Stain (Optional): To personalize your crib's look.
Crib Construction Steps (Simplified):
(Note: Detailed plans with diagrams are beyond the scope of this article but are readily available online. Always prioritize safety and consult multiple sources for reliable instructions.)
- Cut the wood: Cut all the pieces according to your chosen plan, ensuring precise measurements.
- Assemble the frame: Carefully assemble the crib frame using wood glue and screws. Double-check your measurements at each step.
- Add the slats: Attach the crib slats securely, leaving appropriate spacing to meet safety standards.
- Sand and finish: Sand all surfaces smooth, then apply paint or stain (if desired).
- Final Inspection: Before use, meticulously check for any sharp edges or loose parts.
DIY Baby Furniture Plans: The Changing Table
A changing table is another essential piece of nursery furniture. You can build a freestanding one or even incorporate a changing top onto a dresser for a space-saving solution. Again, safety is key; make sure the changing surface is stable and secure.
Changing Table Materials:
- Similar to the crib, you'll need sturdy wood, screws, wood glue, sandpaper, and potentially paint or stain.
- Changing Pad: Don't forget to buy a changing pad! This is crucial for safety and hygiene.
Changing Table Construction Steps (Simplified):
- Choose your base: Use a sturdy dresser you already own or build a simple frame.
- Build the changing top: Construct a stable and appropriately sized changing top, ensuring it's securely attached to your base.
- Safety check: The changing top must have high sides to prevent falls, and ensure it's very securely fastened.
- Sand and finish: Smooth and finish the surface as desired.
Beyond the Basics: Adding Cozy Touches
Once you've got the core furniture in place, it's time to add those cozy details that truly make a nursery special. Think soft lighting, comfortable seating, and plenty of storage.
Creating a Cozy Atmosphere:
- Soft Lighting: A bedside lamp, fairy lights, or a soft glow from a nightlight will create a peaceful ambiance.
- Comfortable Seating: A comfy armchair or rocking chair is perfect for late-night feedings and snuggles.
- Storage Solutions: Utilize baskets, shelves, and drawers to keep the nursery tidy and organized.
- Textiles: Soft blankets, throws, and rugs add warmth and texture.
- Personal Touches: Incorporate photos, artwork, or handmade items to personalize the space.
Commonly Asked Questions
Q: Is building my own nursery furniture safe?
A: Yes, but it requires careful planning, precise execution, and adherence to safety standards. Research thoroughly, use quality materials, and double-check your work before letting your baby use the furniture.
Q: What if I'm not handy?
A: Don't worry! Start with simpler projects, perhaps just a bookshelf or a small toy chest. Plenty of tutorials are available online, and many community workshops can offer guidance.
Q: How long does it take to build nursery furniture?
A: It depends on the complexity of the project and your experience level. A simple changing table might take a weekend, while a crib could take several.
Q: Can I save money by building my own furniture?
A: Absolutely! Building your own furniture can significantly reduce costs compared to buying ready-made pieces. Plus, it's super rewarding!
Q: Where can I find detailed plans?
A: You can find many detailed crib and changing table plans online, on woodworking websites, and in books. Always choose plans from reputable sources.
Building your baby's nursery is a labor of love. While it might require some time and effort, the satisfaction of creating a beautiful and safe space for your little one is unparalleled. Happy building!


No comments:
Post a Comment